Farmhouse style wooden stars add charm to any home. They’re rustic, simple, and beautiful.
Want to know how to make them yourself? It’s easier than you think! Crafting these stars can be a fun and satisfying project. With a few materials and some basic tools, you can create stunning decor that fits perfectly with a farmhouse aesthetic.
Whether you hang them on a wall, display them on a shelf, or use them as holiday decorations, these wooden stars will bring a cozy, country feel to your space. Ready to dive in? Let’s explore how you can craft these charming farmhouse style wooden stars step by step.
Credit: www.youtube.com
Materials Needed
Creating farmhouse style wooden stars is a fun and rewarding DIY project. To get started, you need to gather the right materials. These materials will ensure your stars are sturdy and beautiful.
Wood Selection
Choose the right type of wood for your stars. Pine and cedar are excellent choices. They are easy to work with and have a lovely grain. Avoid using treated wood as it can be hard to cut and shape.
Tools Required
Gather your basic woodworking tools. A saw is essential for cutting the wood. A miter saw or a hand saw will work fine. You will also need a measuring tape for accurate cuts. Sandpaper is necessary for smoothing the edges. A drill with bits will help with any necessary holes. Clamps will hold the pieces together as you work.
Additional Supplies
Have some wood glue on hand. It will help secure your star pieces. You may want to use nails or screws for extra stability. Paint or stain can give your stars a finished look. A brush or cloth will help apply the paint or stain evenly. Lastly, keep a ruler or straight edge nearby. It ensures your cuts and measurements are precise.
Choosing The Right Wood
Choosing the right wood is crucial for creating beautiful farmhouse style wooden stars. The type, thickness, and grain direction of the wood all play important roles. Each of these factors impacts the final look and durability of your wooden stars.
Types Of Wood
Different types of wood have unique properties. Some are easier to work with, while others offer a more rustic look.
- Pine: Lightweight and easy to cut. Great for beginners.
- Cedar: Known for its durability and natural resistance to decay.
- Oak: Offers a strong and sturdy base. It has a beautiful grain.
- Poplar: Affordable and readily available. It takes paint well.
Choose a wood type that fits your skill level and desired look. Pine and poplar are excellent for beginners. Oak and cedar are better for a more polished finish.
Wood Thickness
Thickness affects the strength and weight of your wooden stars. Thicker wood is more durable but harder to cut. Thinner wood is lighter and easier to shape.
| Thickness | Best For |
|---|---|
| 1/4 inch | Lightweight stars, easy to hang |
| 1/2 inch | Sturdier stars, good balance of strength and weight |
| 3/4 inch | Heavy-duty stars, long-lasting |
Choose the thickness based on the star’s intended use. For hanging decorations, thinner wood is ideal. For durable, long-lasting pieces, opt for thicker wood.
Wood Grain Direction
Wood grain direction influences the look and strength of your stars. Cutting along the grain results in smoother edges. Cutting against the grain can create a rugged, rustic appearance.
- With the Grain: Easier to cut and sand. Produces clean lines.
- Against the Grain: Creates a rougher texture. Adds character to the stars.
Consider the desired finish of your stars. For a clean, polished look, cut with the grain. For a rustic, farmhouse feel, cut against the grain.
By selecting the right wood type, thickness, and grain direction, you can create stunning farmhouse style wooden stars. Each choice impacts the final product, so take your time to consider all options.
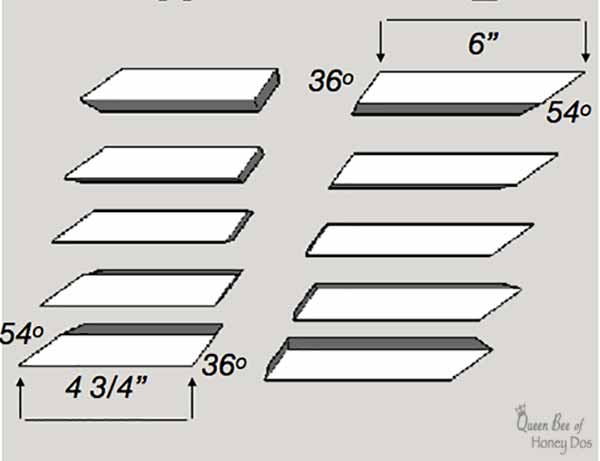
Cutting The Wood
Cutting the wood is a key step in making farmhouse style wooden stars. This process requires precision and attention to detail. By following the steps below, you can ensure your wooden stars turn out perfect.
Measuring Dimensions
Accurate measurements are crucial. First, decide the size of your star. Use a ruler to mark the dimensions on the wood. Make sure each segment is equal. This ensures the star will look balanced and symmetrical.
Using A Saw
Choose the right saw for your project. A miter saw works best for angled cuts. Place the wood securely on the saw table. Align the saw blade with your marked lines. Slowly cut along the lines to create the star’s points. Repeat for each segment until all are cut.
Safety Precautions
Safety is important when cutting wood. Always wear safety goggles to protect your eyes. Use ear protection to safeguard your hearing. Keep your hands away from the saw blade. Use clamps to hold the wood steady. Ensure your workspace is clean and free from obstructions. This will help prevent accidents.
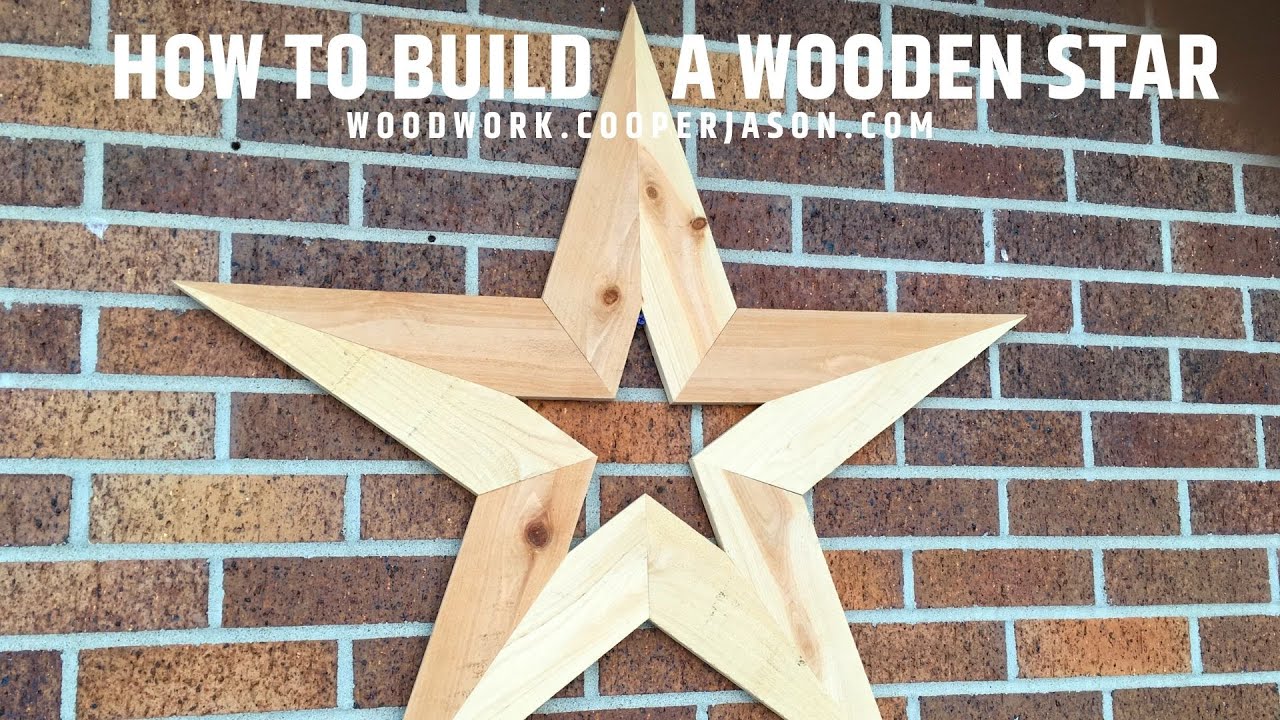
Assembling The Star
After preparing your wooden pieces, the next step is assembling the star. This process is crucial for the final look of your farmhouse-style star. You need to be precise and patient. Follow these steps to ensure your star looks perfect.
Arranging Pieces
Lay out the wooden pieces on a flat surface. Arrange them in the shape of a star. Ensure each point of the star is even. Adjust the angles as needed to match the design. Double-check the alignment before proceeding.
Joining Techniques
Use wood glue to join the pieces. Apply a small amount of glue to the ends. Press the pieces together firmly. Wipe off any excess glue with a damp cloth. Allow the glue to set for a few minutes.
For added strength, use small nails or screws. Drill pilot holes to prevent the wood from splitting. Insert the nails or screws carefully. Make sure they are flush with the wood surface.
Using Clamps
Clamps help hold the pieces together while the glue dries. Place clamps at each joint of the star. Tighten them to ensure a snug fit. Check the alignment once more before the glue sets.
Leave the clamps on for at least 24 hours. This ensures the glue dries completely. Remove the clamps gently after this period. Your farmhouse-style wooden star is now assembled and ready for finishing touches.
Sanding And Finishing
Creating farmhouse-style wooden stars involves several crucial steps. Sanding and finishing are essential to achieve a smooth, rustic appearance. These steps ensure the wood’s surface is even and protected, enhancing its aesthetic appeal and longevity.
Sanding Tips
Begin with a coarse grit sandpaper, around 80 grit, to remove rough edges. Gradually move to finer grits such as 120 and then 220 for a smoother finish. Always sand in the direction of the wood grain to avoid scratches. Use a sanding block or an electric sander for consistent pressure.
| Grit | Purpose |
|---|---|
| 80 | Initial sanding, removes rough edges |
| 120 | Smooths surface further |
| 220 | Final sanding, ultra-smooth finish |
Applying Stain
Choose a stain that complements your farmhouse decor. Stir the stain well before use. Apply it using a clean, lint-free cloth or a brush. Wipe off excess stain after a few minutes to control the depth of color. Allow the stain to dry completely as per the manufacturer’s instructions.
- Stir stain thoroughly
- Apply with cloth or brush
- Wipe off excess
- Let dry completely
Sealing The Wood
Sealing the wood is the final step to protect your wooden stars. Use a clear polyurethane sealer for a durable finish. Apply the sealer with a synthetic brush in thin, even coats. Allow each coat to dry thoroughly before adding another. Lightly sand between coats with 220 grit sandpaper for a smooth finish.
- Use clear polyurethane sealer
- Apply in thin, even coats
- Let each coat dry
- Lightly sand between coats
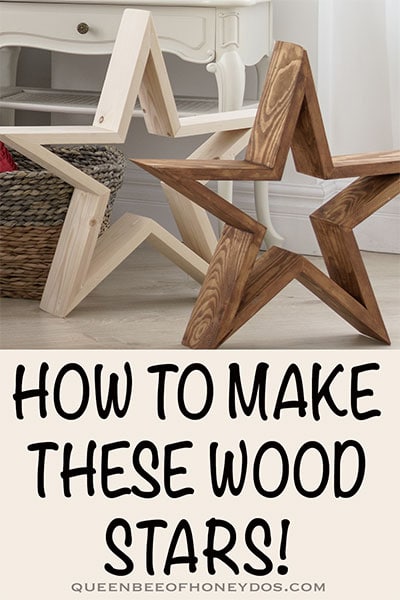
Decorative Touches
Adding decorative touches to your farmhouse style wooden stars can elevate their charm. Simple enhancements can make your stars unique and appealing. Let’s explore some creative ideas for painting, distressing, and adding embellishments to your wooden stars.
Painting Ideas
Choose paint colors that match your farmhouse theme. Soft whites, muted blues, and earthy greens work well. Use matte or chalk paint for a rustic look. Try a two-tone effect by painting the star’s edges a different color. Stencils can add patterns like stars, stripes, or checks. Experiment with ombre effects for a modern twist.
Distressing Techniques
Distressing gives your stars an aged, vintage look. Sand the edges lightly to reveal the wood underneath. Use a wire brush to create deeper grooves and texture. Apply a dark wax over the paint, then wipe it off for an antique finish. You can also use a dry brush technique. Dip a dry brush in paint and lightly brush over the surface.
Adding Embellishments
Embellishments add a personal touch to your stars. Glue buttons, beads, or small pieces of fabric onto the star. Wrap twine or ribbon around the points for added texture. Attach small metal stars or charms for extra sparkle. Consider using decoupage to add patterned paper or fabric. You can also add small wooden letters to spell out words or names.
Displaying Your Stars
Displaying your farmhouse style wooden stars can add charm to any space. Whether you want to enhance your indoor decor or create a welcoming outdoor ambiance, these stars can be a versatile addition to your home. Let’s explore some creative ways to display your wooden stars effectively.
Indoor Display Options
Indoor displays can make your home feel warm and inviting. Here are some ideas:
- Fireplace Mantel: Place your wooden stars on the mantel. Arrange them with candles and small plants for a cozy look.
- Bookshelves: Add stars to your bookshelves. They can complement books, photo frames, and other decor items.
- Wall Art: Hang the stars on a feature wall. Create a pattern or mix them with framed photos and art pieces.
- Table Centerpieces: Use a star as the centerpiece for your dining or coffee table. Pair it with seasonal decorations for a festive touch.
Outdoor Display Options
Outdoor displays can enhance your garden, porch, or patio. Consider these options:
- Garden Stakes: Attach stars to stakes and place them in flower beds or along pathways.
- Front Porch: Hang stars on the porch. Combine them with potted plants and a welcome sign for a charming entrance.
- Fence Decor: Mount stars on your fence. They can add a rustic touch to your backyard.
- Tree Ornaments: Hang stars from tree branches. Use weather-resistant materials for durability.
Hanging Methods
Proper hanging methods ensure your stars stay secure and look great. Here are some methods:
- Command Hooks: Use adhesive hooks for damage-free hanging. Ideal for indoor and temporary setups.
- Nails and Screws: Secure heavier stars with nails or screws. Perfect for outdoor or permanent displays.
- Twine or Rope: Hang stars using rustic twine or rope. Adds an authentic farmhouse feel.
- Fishing Line: Use clear fishing line for a floating effect. Great for subtle and clean displays.
These methods and ideas can help you showcase your farmhouse style wooden stars beautifully. Try different combinations to find what suits your space best.
Credit: www.queenbeeofhoneydos.com
Troubleshooting Common Issues
Creating farmhouse style wooden stars can be fun. But you might face some issues. Don’t worry. Here are some common problems and how to solve them.
Fixing Misalignments
Misaligned parts can ruin your star. First, check all your cuts. Ensure they are at the right angle. Use a protractor for accuracy.
If parts don’t fit well, sand down the edges. This helps them align better. You can also use wood glue to hold pieces in place while adjusting.
Dealing With Splinters
Splinters can make your stars look rough. To fix this, sand the wood before assembling. Use fine-grit sandpaper for a smooth finish.
Always sand along the wood grain. This prevents more splinters. After sanding, wipe the wood with a damp cloth. It removes dust and splinters.
Ensuring Stability
Your star should be stable and sturdy. Use screws or nails for extra support. Wood glue alone might not be enough. Place screws at the joints for added strength.
Check all connections. Make sure they are tight. If needed, add more screws. This ensures your star stays together.
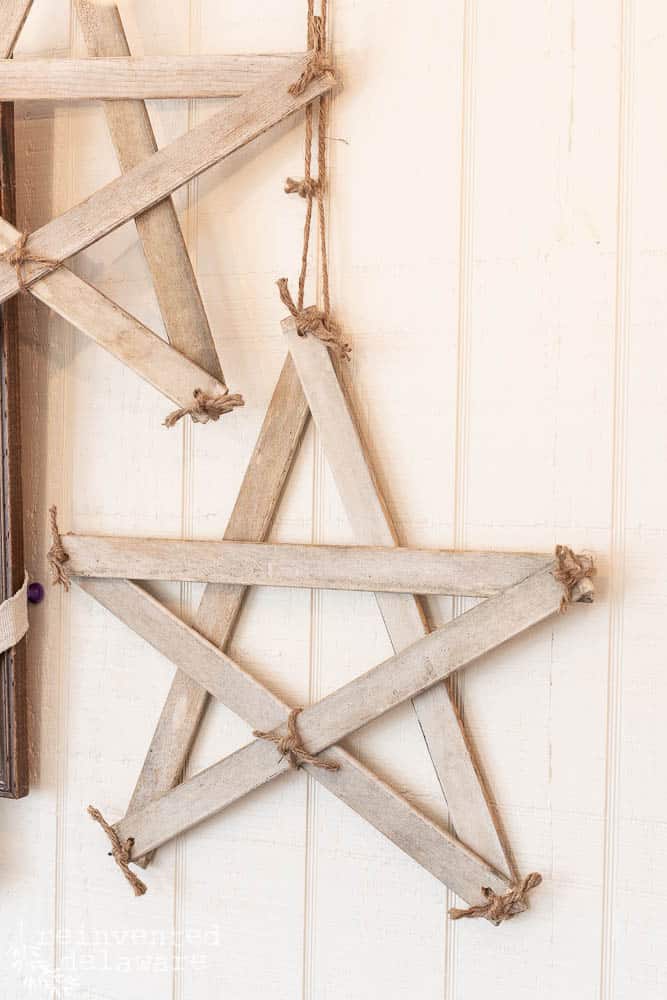
Credit: www.reinventeddelaware.com
Frequently Asked Questions
What Materials Are Needed For Wooden Stars?
To make farmhouse style wooden stars, you’ll need wood, a saw, sandpaper, wood stain or paint, and glue.
How Do You Cut Wood For Stars?
Start by cutting wood into equal strips. Then, cut the strips into 45-degree angles to form the star points.
What Is The Best Wood For Farmhouse Stars?
Pine or reclaimed wood is ideal for farmhouse style stars. They are easy to work with and stain well.
How Do You Assemble Wooden Stars?
Arrange the cut wood pieces into a star shape. Use wood glue to secure the joints and let it dry.
Conclusion
Creating farmhouse style wooden stars is fun and easy. These stars add charm to any space. Gather your materials, follow the steps, and enjoy the process. Feel proud of your handmade decor. Share your creations with friends and family. They will appreciate the personal touch.
Keep experimenting with designs and colors. Your home will look warm and inviting. Happy crafting!

Sarah Bennett is a passionate home decor enthusiast and the creative mind behind ConsumerDecor. With a love for design and an eye for detail, she shares inspiring ideas, emerging trends, and practical tips to help readers create beautiful, functional living spaces. Sarah believes that every home deserves a touch of style, no matter the budget.